Thursday, March 31, 2011

Power Switch for a blade server -- an interesting find


We had a power outage for about 6 hrs at our office and the UPS would last only for 1 hr. We decided to do a managed shutdown of the servers and then power them back up the next day when the power came back up. I was responsible for coming early in the morning and switching on all the servers.

As mentioned in an earlier post our systems administrator is no longer with us, Andrew joined us to take over this role. He did the shut down part the previous night and called and said that he cannot find the power switches for the blade servers. I also didn't know where the power switches for the blade servers were. I have asked him to go home and said that I will deal with that in the morning.

Now the image below is how the blade server looks.



As you can see there is no way you will know that there is no power switch that is visible to the human eye. I did a lot of googling the night before to get some insight but could not find any documentation. For those who have dealt with the blade servers this could be very easy. But finally I figured out that the glass apnel above can be opened. When that was opened there lies the hidden power switch neatly as shown in the image below highlighted in red.

Friday, March 25, 2011

The keyboard shortcuts I use

Yesterday I was working with my colleague and she was surprised with the number of shortcuts I use with Windows Key .

So I thought I could list all the shortcuts for the benefit of her and others

To open the Start Menu -- just click Windows Key
To open the windows exlpoer -- click Windows Key + E
To open the seach/find window -- click Windows Key + F
To display the desktop by minimising all the open windows -- Click Windows Key + D (I have found this really helpful)
To lock your computer -- click Windows Key + L (Easy to remember)
To open the run command -- click Windows Key + R
To display the Help window -- click Windows key + F1
To zoom in the screen -- click Windows Key + =
To Zoom out the screen -- click Windows Key + -
To go through the open windows one by one -- Windows Key + Tab (Similar to Alt+Tab) but the display is really nice.

If you have windows open and your windows 7 gadets are hidden behind them you could bring them on top of the applications you use -- Windows Key + G

If you use two screens -- two helpful shortcuts are
Moves the current windows to the left screen, when running dual monitors -- Windows Key + Shift + Left arrow
Moves the current windows to the right screen, when running dual monitors -- Windows Key + Shift + Right arrow

There could be other shortcuts which you also might be using. Please let me know so that I could start using them as well.

Wednesday, March 23, 2011

Have you heard about Channel 9?

I stumbled across Channel 9 yesterday while researching. Channel9 is a Microsoft maintained site which is full of videos, blogs, shows, series etc. There is too much information on this site for one to absorb and learn.

Here is the link to the site. I hope you will enjoy this learning.

Monday, March 07, 2011

Data Mining and Analysis -- Free Expo from SSWUG

Here is another Free Expo Event from SSWUG that covers Data Mining and Analysis. The event is scheduled for March 18th 2011 from 9 am to 12 pm PST.

Sessions will cover the following topics:
  • Using Data Mining Plugins with Excel
  • Developing SQL Server Data Mining Models
  • Understanding Data Mining APIs
  • Finding Patterns and Relationships in Server Data


You can register now if you would like to learn from three skilled data mining experts.

Friday, March 04, 2011

Conditional formatting using multiple conditions - Excel 2007

Today I had a requirement to colour code in Excel based on a few conditions. At first I thouhgt I could use thre to four rules in the conditional formatting to achieve this result but when I did that the results that I was getting was not very satisfactory. So I thought I would try the And function of excel in conjunction with the conditional formatting and it worked wonders.

I wanted the entire row to be highlighted in a certain colour based on three conditions.

Here are the steps I followed to achieve what I was after.
  • Select all the data that you want to colour code.
  • Click on Conditional Formating on the Home Tab
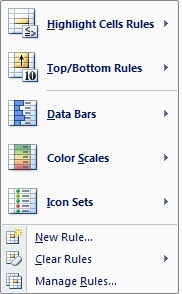
  • Choose Manage Rules as shown below


  • From the dialog that appears click New Rule.
  • Add the multiple conditions using the And function in the formula box
  • The most important thing you need to do when you are adding the formula to highlight rows is to remove the $ sign that gets assigned when you choose the cell for entering a formula with a mouse.
  • Choose the colour by clicking the format button and click ok
  • Click Ok again to come out of the Manage Rules window.


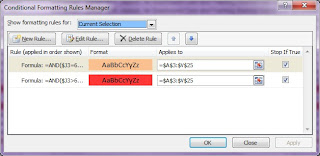
As you can see below I have added two rules and it is giving me the result that I want.


Thursday, March 03, 2011

Have you heard about Snipping Tool?

Thanks to one of my colleagues, yesterday I learnt about the Snipping Tool which is avaibale in Windows 7. To activate the tool -- Click on Start -- All Programs -- Accessories -- Snipping Tool. A screenshot of the tool is shown below.


Snipping tool enables you to select an area on your desktop or the entire desktop using your mouse and save this as an image for future use.
Until now I used to use the key board shortcuts PRintscn for capturing a screenshot of the entire desktop or Ctrl + Alt + PrintScn to capture the active window. Then open Paint and then save as an image.


Only drawback of the snipping tool that I found was if you have try to capture a screenshot of the values in a drop down of the filter feature of the excel, you could not do that using the Snipping Tool as you are trying to use your mouse to invoke the snipping tool. When you do this the drop down disappears in excel and hence you cannot take a screenshot of what is not appearing on your screen.
But the command that I always used Ctrl + Alt + PrintScn worked as shown below.


If anyone of you know of a workaround for this I would be pleased to know about it.

Tuesday, March 01, 2011

Processing of SSAS cube -- steps for beginners

I thought today I will cover the steps that can be followed to process a Sql Server Analysis Services Cube from Sql Server Management Studio.

The assumption is that you already have a cube that is built in SSAS and you would like to process this cube from sql server management studio

Step 1
Connect to the sql server analysis services instance from the sql server management studio as shown below.


Step 2
From the left hande side menu click on the plus beside Databases.

Step 3
Right click on the cube that you would like to process as shown below.


Step 4
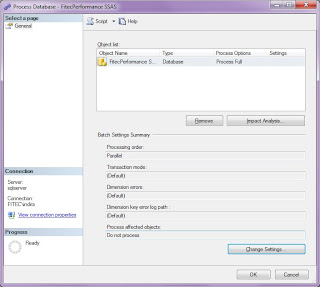
The following dialog appears. Click on change settings if you need to and click on OK. Depending on the amount of data the processing takes a few minutes upto a few hours.


Free Power BI Classes for Week 7 (Last)

Just completed the last class of the F ree  P ower BI  classes of this series.  Today we have covered Adding a canvas background Adding Imag...